Automatically Ripping an Audio CD
Our step-by-step guide shows how making MP3s from your CDs is convenient and easy with Windows Media Player. This article will show you how to rip your CDs without pressing a single key.
After following these steps, any time you insert an audio CD into your computer, Windows Media Player will automatically copy it to thelibrary on your hard drive. If the CD has already been copied, it will let you know.
Before getting started, make sure you have configured Windows Media Player for CD ripping by following the Knowzy step-by-step guide.
Change Your "AutoPlay" Setting
The first step is to tell Windows what to do when an audio CD is inserted into your CD-ROM drive. This is done by changing your AutoPlay setting for the CD-ROM drive.
If you have more than one drive, you can make this change to all of them or you can designate one of your drives to be your CD ripping drive.
It doesn't matter if your drive is a CD-ROM, a DVD-ROM, a CD burner or a DVD burner. All are capable of ripping audio CDs.
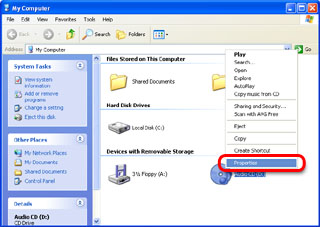
 | | Context Menu for CD-ROM in My Computer Window Right-click your CD-ROM drive and click "Properties..." to bring up the AutoPlay settings for the drive. |
Let's get to it! First, bring up "My Computer" (found on the Start Menu). Next, right click the CD-ROM drive. This will bring up a menu. Click "Properties..." on the menu. Now select the "AutoPlay" tab to configure the action to take when an music CD is inserted.
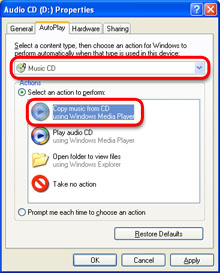
 | | AutoPlay Window Choose "Music CD" from the dropdown list and select "Copy Music from CD." |
In the AutoPlay tab of the CD-ROM Properties window, choose "Music CD" from the dropdown list at the top. Look closely: The default is "Music Files" and that's the wrong choice!
Now click the "Select an action to perform" radio button. This will enable the choices below it. Finally, select "Copy Music from CD" and click the "OK" button.
You have now configured Windows to automatically rip audio CDs to your hard drive. But you're still not quite done.
Rip Music Options in Windows Media Player
If you want truly automatic audio CD ripping, there are two more settings to configure.
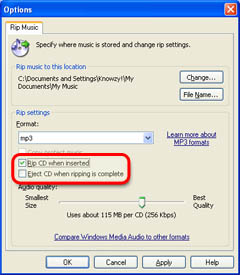
Start Windows Media Player and select the "Options..." menu item from the "Tools" menu. This will bring up the Options dialog box. Select the "Rip Music" tab and you should see the settings below.
 | | Rip Music Tab in Windows Media Player Options Window Check "Rip CD when Inserted" and, optionally, "Eject CD when ripping is complete." |
The "Rip CD when inserted" checkbox tells Windows Media Player that to automatically rip audio CDs when it is running.
How is that different from changing the AutoPlay setting in the first step, you ask? When Rip CD when inserted setting is off, if Windows Media Player is already running when you insert an audio CD, nothing will happen. This is especially noticeable when ripping several CDs in a row.
The other setting to consider is "Eject CD when ripping is complete." This is a handy way to know when Windows Media Player is done with your CD: the door to the CD-ROM drive will open automatically.
If you turn this setting on, don't set your drink in front of the CD-ROM drive. I learned this one the hard way!
Your PC is now an automatic CD ripping machine. Here's to your budding MP3 collection!
Originally Published: Sunday, September 25, 2005, 5:00 PM PT Last Updated: Monday, June 27, 2011, 11:01 PM PT Version 1
Topic Guide
| You are viewing the Knowzy topic: |
|
|
Instructional Guide 3 Items
Automatic CD Ripping with Windows Media Player (Viewing) Step-by-Step
Multimedia and Tools 1 Item
|